
Create Halloween Costumes This Year And Make Lasting Memories!
|
||||||||||||||
| Printer Friendly Story View |
This time of year is always an opportunity to do fun and exciting projects with your children. One project that can leave lasting impressions and wonderful memories with your children is creating their Halloween costumes! Some of the best memories I know my children will carry with them is Mom attempting to put together their vision of what they want to be for Halloween.
Below are some ideas for making such cherished memories quicker and easier on the pocket book than running all over town to those "once per year" Halloween stores!
Photos Courtesy of Parenting.com
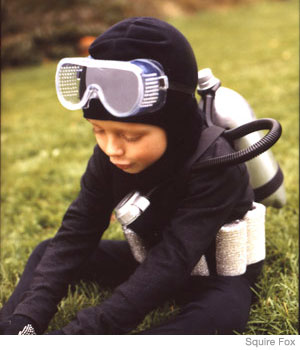
DIVER: Scouring pads, a soda bottle, and other household products give you a deep-sea diver's duds.
Scuba gear:
3 yards black nylon webbing
1 yard self-adhesive Velcro
6 metallic scouring pads
2-liter plastic soda bottle
1 sports-bottle lid
Silver spray paint
4 inches black rubber tubing
18 inches cord-keeper tube
Wet suit:
Black hooded sweatshirt
Black tights or leggings
Black gloves
Plastic safety goggles
1. Cut a piece of nylon webbing 2 inches longer than your child's waist circumference. Attach Velcro pieces to each end for a belt. 2. Measure your child from front of waist, over shoulders, to back of waist. Cut two straps of webbing to this measurement. Glue one end of each piece of webbing to the center of the back of the belt, about 1/4 inch apart. Attach loose ends to front of belt, about 3 inches apart, like suspender straps.
3. Fold scouring pads into tubes and glue edges together. Glue tubes around belt to create diving weights.
4. Coat soda bottle and sports-bottle lid with spray paint and let dry, about one hour.
5. Glue a piece of webbing around bottom of soda bottle to resemble an air tank. Attach bottle to belt and straps with pieces of Velcro.
6. Wrap rubber tubing around the mouth of the soda bottle and glue ends inside cord-keeper tube.
Push other end of cord keeper into loop of painted sports-bottle top for a ventilator; tuck cord-keeper tube under webbing strap to hold in place
Photos Courtesy of Parenting.com
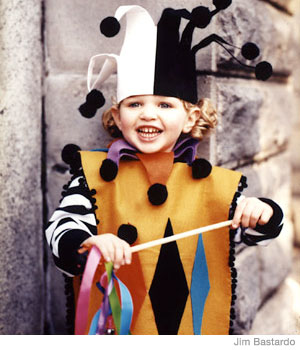
JESTER: A perfect idea for your household's resident comedian. She'll be the life of the party! Felt cutouts and glue-on trimmings make it easy.
1 1/2 yards gold felt
Felt in various colors
Black pom-poms
1-inch-wide grosgrain ribbon, 2 feet each of various colors
12 x 18-inch piece each white and black EZ felt
Wooden dowel
Jingle bells
Wiffle ball
Black paint
Striped pajamas, boots
Tunic: Measure child from shoulders to mid thigh and across chest. Double the shoulder-to-thigh length and cut a piece of gold felt to this measurement. Fold in half crosswise and cut a slit for the neck along this fold. Glue 3 felt diamonds on the front and felt triangles and black pom-poms along the bottom, as shown. Collar: Measure child's neck loosely and cut a piece of ribbon to this length. Cut 9 felt diamonds; glue ends together to create loops. Glue black pom-poms to tips. Thread onto ribbon and tie around neck.
Hat: Measure child's head and add an inch. Divide by 2 and cut out 1 piece each of white and black EZ felt to that measurement. Glue felt pieces together along one side. Wrap around child's head to check fit; glue other sides together so hat fits snugly. Cut out triangles along the top and glue pom-poms to the points, as shown.
Wand: Glue lengths of ribbon to a wooden dowel and tie bells on their ends. Paint Wiffle ball black and glue it to top of dowel.
Photos Courtesy of Parenting.com
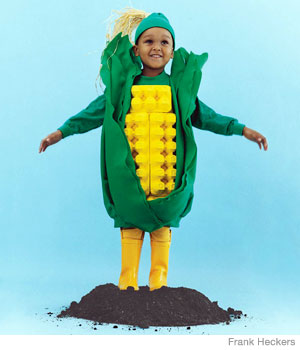
CORN ON THE COB: For this costume, you'll need:
hot glue or fabric glue
scissors
tape measure
1. Cut sleeves off a green sweatshirt. Turn in armholes and glue raw edges.
2. Give 3 paper egg-carton bottoms a coat of yellow paint. When dry, glue to front of sweatshirt for kernels, as shown.
3. Cut 1 yard of green felt in half. Pull on felt to create irregular edges. Fold and glue along each side of egg cartons, as shown. Glue green pipe cleaners to the back of felt at the top to help the "husk" tips stand up.
4. Hat: Measure child's head and cut a sleeve to fit, leaving an extra inch at the top. Cut a bunch of raffia and bundle together. Wrap a strand around base of bundle to keep it together; glue to hat for corn silk.
Photos Courtesy of Parenting.com
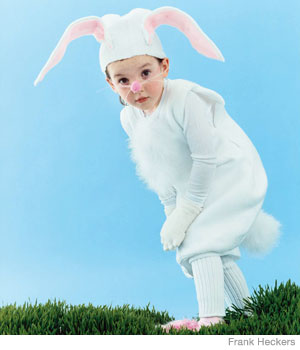
BUNNY:
hot glue or fabric glue
scissors
tape measure
1. Cut sleeves off a white sweatshirt. Turn sweatshirt fleece side out. Line inside with Poly-Fill batting and glue at neck and armholes. Fold in and glue raw edges.
2. Bunch up a piece of white marabou boa and glue to the back bottom center of body for the tail. Glue another piece of boa at the neck for tuft of fur on chest.
3. Hat: Turn one cut-off sleeve fleece-side out and glue closed at one end. For the ears, cut two 7-inch-long triangles from the other sleeve, fleece side out. Glue two teardrop pieces of pink felt on the inside, allowing a 1/4-inch perimeter. Pinch wide ends together and glue to hat.
Photos Courtesy of Parenting.com
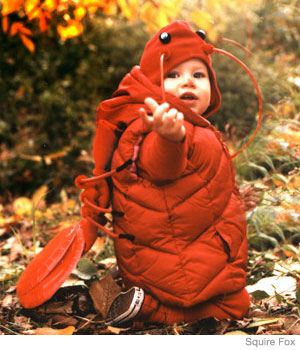
LOBSTER: Paper plates, pipe cleaners, and googley eyes are the makings of a cute crustacean. All materials are available in crafts stores and/or hardware stores. You'll also need hot glue or craft glue and scissors.
2 googley eyes
2 black pom-poms
Red fleece balaclava
10 red pipe cleaners
5 feet red plastic tubing
1/2 yard red felt
Bubble wrap, 18 x 8 inches
6 black pipe cleaners
3 red paper plates
1/2 yard self-adhesive Velcro
Red vest or sweatshirt
Red mittens
Head: Glue googley eyes to black pom-poms, then glue the pom-poms to the front of the balaclava for eyes. Wrap a small piece of red pipe cleaner around the end of two 12-inch pieces of tubing for antennae. Glue them under eyes, as shown.
Tail: 1. Glue red felt to both sides of bubble wrap. Wrap two red pipe cleaners around felt (about 3 inches apart) to create vertebrae ridges.
2. Cut six 6-inch pieces of red tubing for legs. Push pieces of black pipe cleaner through all of them, leaving an inch or so of pipe cleaner sticking out one end. Wrap a red pipe cleaner about 2 inches around the other end of tubing. Glue 3 legs to each side of the middle of felt tail. 3. Glue 2 paper plates together, side by side, and glue a third plate centered over the first two. Then glue the plates to the end of the felt portion of the tail to make flippers.
4. Attach tail to upper back of vest or sweatshirt with Velcro.
Every year I search for a new recipe for something fun to eat with my children on a Sunday afternoon while we create their costumes. Below is a fun treat we have made in the past, easy to put together and sure to surprise them regardless of their age when you pull them out of the freezer! As for this year, I have not yet found that special "something" to make their faces light up!
Photos Courtesy of Parenting.com
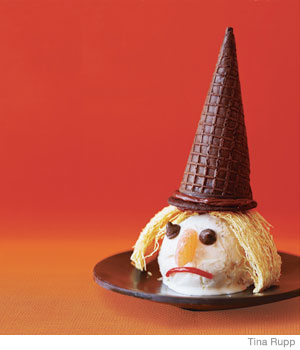
Makes 4 witches; freeze 3 hours before serving.
1 qt vanilla ice cream
2 pouches shredded wheat cereal
4 Nabisco Famous Chocolate Wafers
Chocolate icing
4 Oreo ice cream cones
8 chocolate chips
1 bag gummy candy
1 red licorice lace
1. Divide ice cream into four 1-cup scoops; wrap each in plastic wrap and freeze until firm, at least 3 hours.
2. Pull apart shredded wheat into thin strips to use as hair; set aside. Spread chocolate icing on each wafer cookie and stick on a cone for the hat.
3. Unwrap each ice-cream scoop and place on a plate; top with shredded-wheat hair. Use chocolate icing as glue to stick cone hat atop hair, as shown. Add chocolate-chip eyes, gummy-candy nose, and licorice-strip mouth. Serve this wicked witch before she melts!
TIP: Remember to serve your kids a "ghoulish" full-filling meal before trick or treating so they won't be tempted to eat any candy before you bring it home to check it out.
For Information On How Your Business Or Event Can Be Featured, Call Sales & Marketing Director, O.J. Cunningham At ((989) 892-8501 Or Email OJ@MyBayCity.com TODAY!
| Printer Friendly Story View |
|
|
Prior Article
March 5, 2025 by: Stephen Kent St. Patricks Parade 2025 - IT's TIME |

|
Next Article
February 10, 2020 by: Rachel Reh Family Winter Fun Fest is BACC Hot Spot for 2/10/2020 |
|
|
MyBayCity Staff |
|
|
|
Printer-Friendly Story View
0200 Nd: 06-05-2026 d 4 cpr 0
12/31/2020 P3v3-0200-Ad.cfm
SPONSORED LINKS
12/31/2020 drop ads P3v3-0200-Ad.cfm